

So I did a thing. Well, I tried to do a thing and was somewhat successful, and I’ll tell you my mistakes and how I’m trying to fix them.
So I am a member of Design Bundles and they have these $1 deals, and one of the deals was puzzle templates. So I went to Cricut Design Space and uploaded the SVG file for one of the templates and a screenshot from The Elder Scrolls Online. The screenshot above is a second attempt because the first one was too dark, and with my bad eyes, I couldn’t make out what the piece was for.
So, the template isn’t the entire puzzle that you print an image and then have the Cricut cut the entire puzzle on your image. When you go to cut the puzzle, it cuts puzzle pieces. So the only way to cut is to have the image in Cricut design space and slice the image in 250 pieces. It took awhile lol. This is what it looks like on the print and cut sheet.

That was the darker image I was cutting.
So here are the mistakes I made. I printed these on 8.5×11 65lb white cardstock. I put the glue on the paper and then placed it on the Chipboard and then ran it through the Cricut. It was too wet and I didn’t use a thin amount of glue, so it just ripped the paper. Take 2 was to use a glue stick. Unfortunately, the glue would dry before I got it all over the area I had to glue. I decided to use a repositionable glue stick because you are supposed to let it dry before you stick the paper on, but it doesn’t stay on lol. So my alternative is to buy glossy sticker paper because the cardstock wasn’t glossy and sticker paper will actually stick permanently. Not using anything glossy was a mistake and using a dark image was a mistake. Also, I’ll have to print using Best so it prints out with the best graphics it can have.
I haven’t bought the sticker paper yet because I’m having surgery soon on my right eye and I don’t want to risk it coming the day of surgery.
To make the box for the puzzles I will use the same box I use for Paracord bracelets, except I made the box bigger.
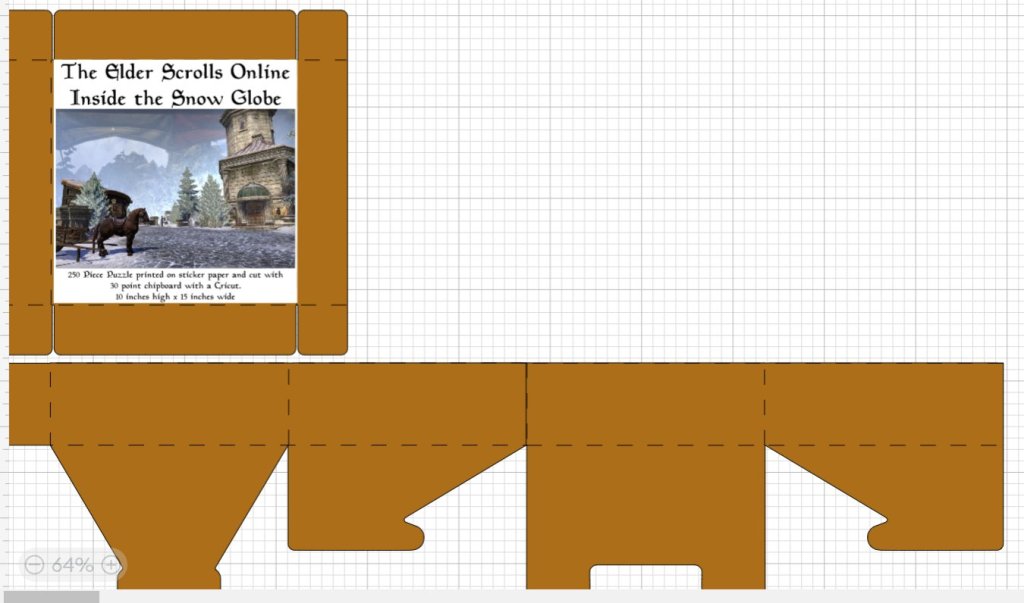

I used a light chipboard which is 22pt for the puzzle pieces I did manage to cut, but I would like to try using the 30pt chipboard to see if it would be better. I will use the 22pt chipboard for the box. I’ll also change the text I made for the box lid.
This is just a test to see if I can make a puzzle with a box. I would like to make puzzles to send as gifts. I think people would like that.
Update: I tried and it just didn’t work out with the materials that I have. I bought some glossy sticker paper that I have used to make actual stickers with, but I’m having trouble with my Cricut not reading the registration lines. I have done all the necessary things to make it so that the Cricut can read the registration lines on glossy paper, like putting matte Scotch tape on top of the lines and if that doesn’t work then go over those lines with a sharpie. For some reason it just does not want to read the registration lines. The only thing I can think is to use regular cardstock and hope that the glue stays on the chipboard and then just put mod podge over the puzzle pieces after they’ve been cut out. I can’t think of anything else to do that would work.
This is the most frustrating thing lol. If somebody has any other bright ideas, I would sure love to know them. It seems like the light on the Cricut that reads the registration marks for print and cut isn’t as bright on the lines as it used to. Maybe it’s my Cricut. It seems to read the registration lines on regular card stock though, so I don’t know.

