I bought some Diamond paintings from Temu when I first started Diamond painting back in April. I have since bought so many more diamond paintings from Michael’s craft store that will probably keep me busy for the next year or longer, but I wanted to buy some more rainbow and psychedelic type of diamond paintings to sell at the craft fair this coming October and also in my Etsy shop. I think these will work really well for the craft fair though because the craft fair is located at a place that sells tarot cards and crystals and Sage and they actually have psychics on staff on duty at all times to give readings to people. This is the type of a place that I believe these Diamond paintings would sell best at.
I think people are starting to think that my shopping for Diamond paintings is a little out of hand, but I’m not shopping for myself. This is not because of an addiction that I have to diamond painting, this is a business decision for selling the resulting product in my Etsy shop and at a craft fair. There’s a big difference in buying something that I want for myself because I want it, and buying something that I think that I can sell.
I have made two rainbow diamond paintings to sell at the craft fair and in my Etsy shop and I have four more to make in a box in my room, but I think these will make a great addition.
These Diamond paintings will be here soon in the mail, so I don’t really know how they’re going to look once they get here. I don’t know what the actual diamond painting canvas looks like because they only showed the pictures that I have above in this blog post. Normally I don’t like to purchase a diamond painting unless I know how it will look on the canvas with all the symbols in the squares or if it’s a printed graphic with symbols floating on top of the image, but I really liked these images and if I don’t find that I’ll be able to make these, then that’s fine. They can sit in a box and I will work on them another time, but I have a feeling I’m not going to have a problem making these.
These Diamond paintings were ordered on August 18th, which was about 2 weeks ago. Normally you would have to wait that long if they were coming from China, but these are local, so they’re coming from Atlanta, Georgia in the USA. But because they were a pre-order, it’s taking a little longer. That’s okay because I have way more than enough work to keep me busy before these even get here which should be in a couple of days. After I receive these, I probably won’t even get to them for another couple or a few weeks.
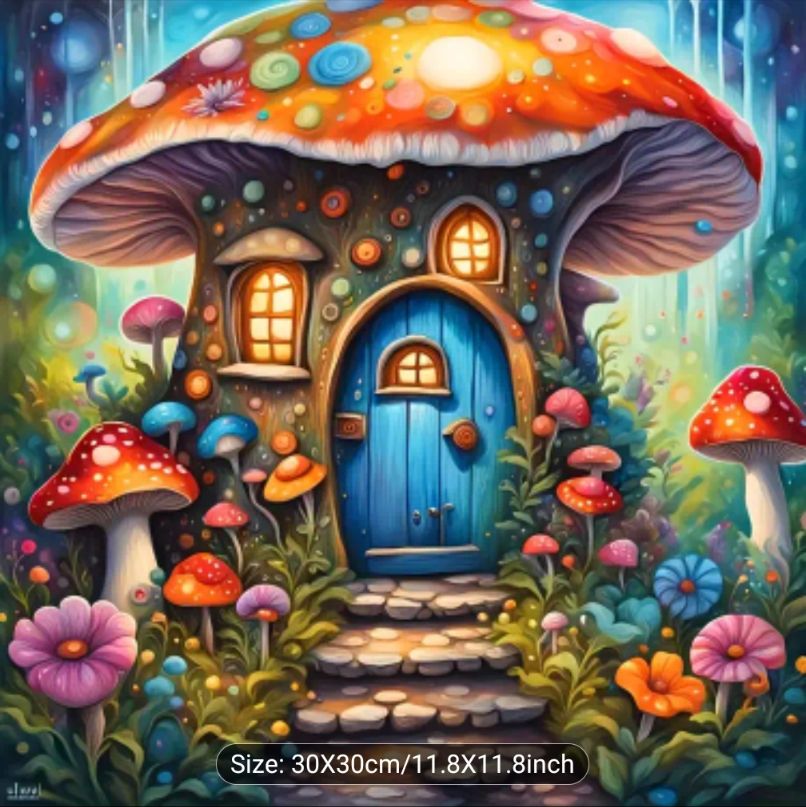
I just think these look really cool and I love the colors and I love the mushrooms and I can’t wait to see how they look when they get here.
When I first started Diamond painting in April this year, I had no plans on making Diamond paintings to sell, but, I didn’t rule it out entirely. My main focus was to collect the leftover Diamond drills for using in my papercrafts and if I found that I liked making the diamond paintings, then perhaps I will sell the product that came from it. My Etsy Shop focuses mostly on things that are rainbows because it is a gay Etsy shop and rainbows are a big part of the gay community, so, I like to make things with rainbow colors to sell to people in my community.
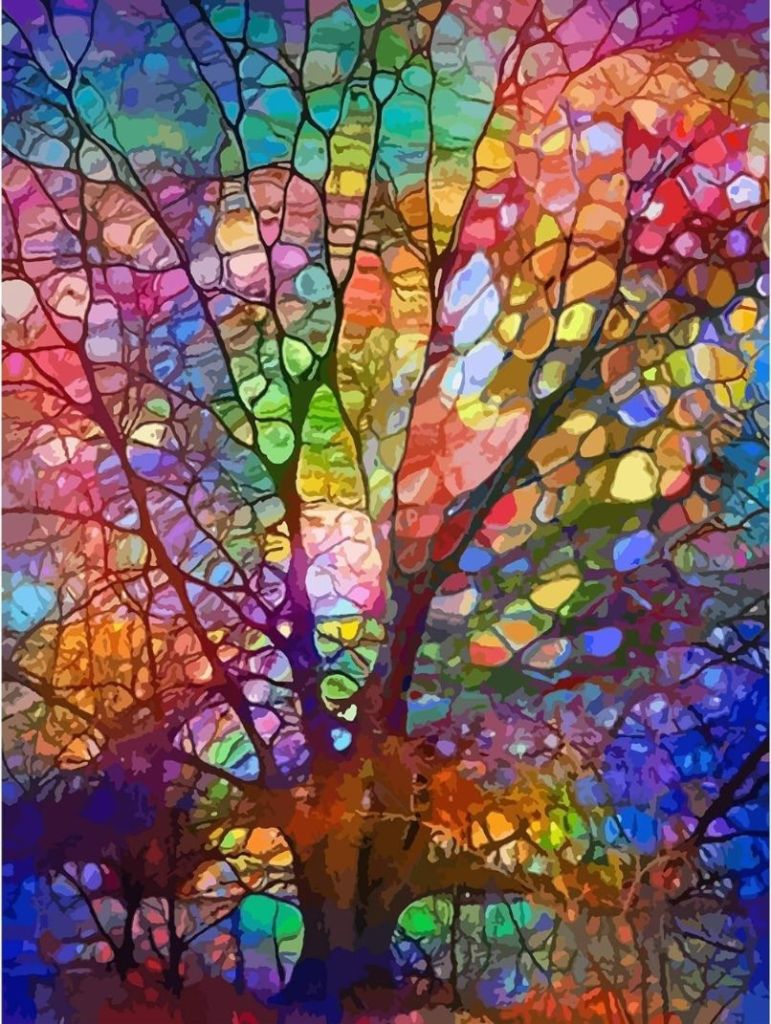
Over the last few months I have been buying rainbow themed Diamond paintings and these six are ones that I do plan on making. I have made one of these, the tree of life on the very bottom left and it did not come out as well as I thought it would, but it is still a nice Diamond painting. I think that the other ones will look a lot better based on the way they look on the canvas with the squares and symbols in them.
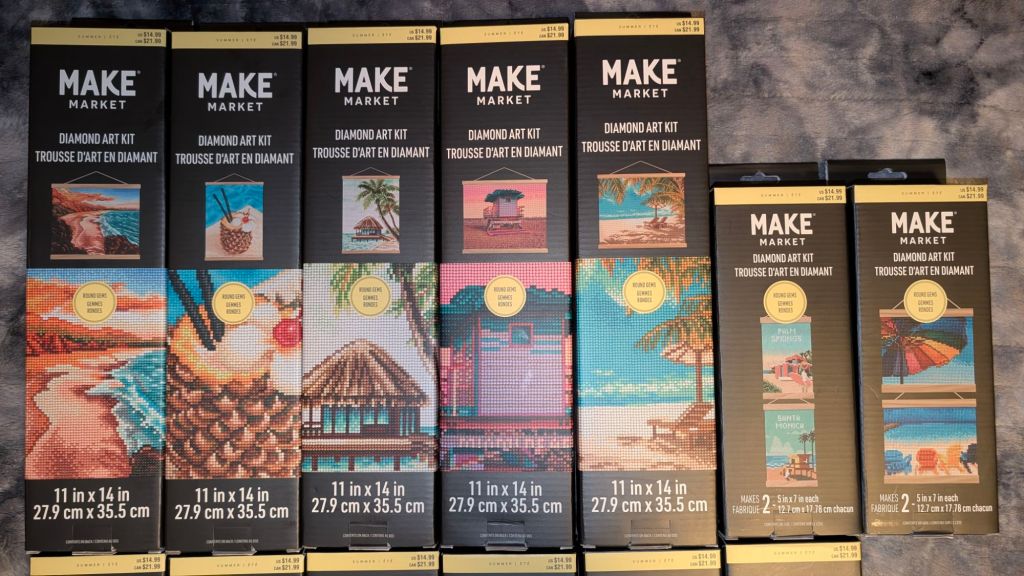
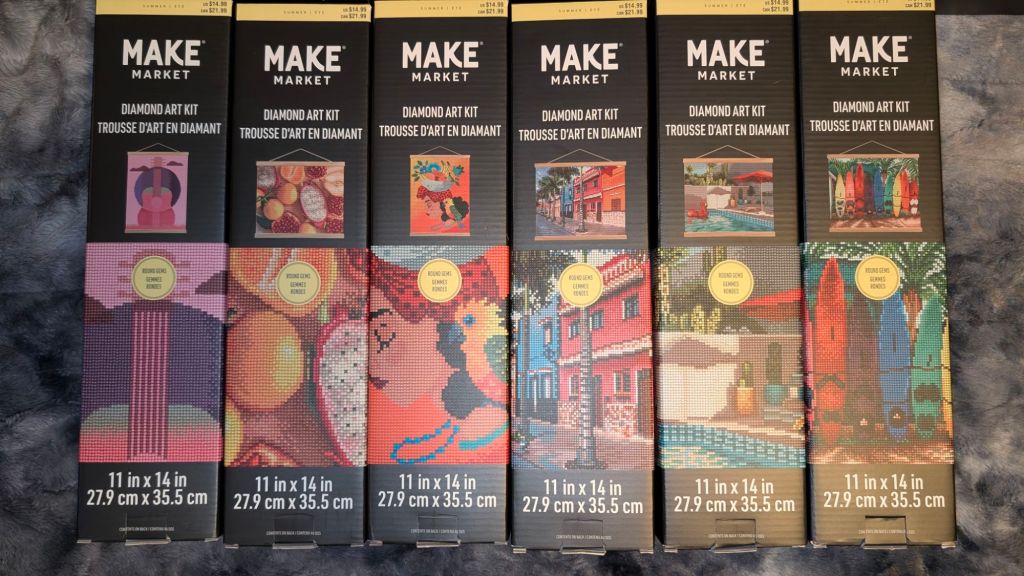
Most of the diamond paintings that I’ve bought from Michaels are summer themed and I do plan on selling those as well, and those are the ones that I seem to be working on mostly rather than the rainbow diamond paintings. I will be getting to the rainbow ones, but I would like to focus on finishing all of the Michaels summer diamond paintings so that I can put those in a single listing first, and then when those are finished, I will start working on the rainbow themed Diamond paintings and put all of those in one listing.
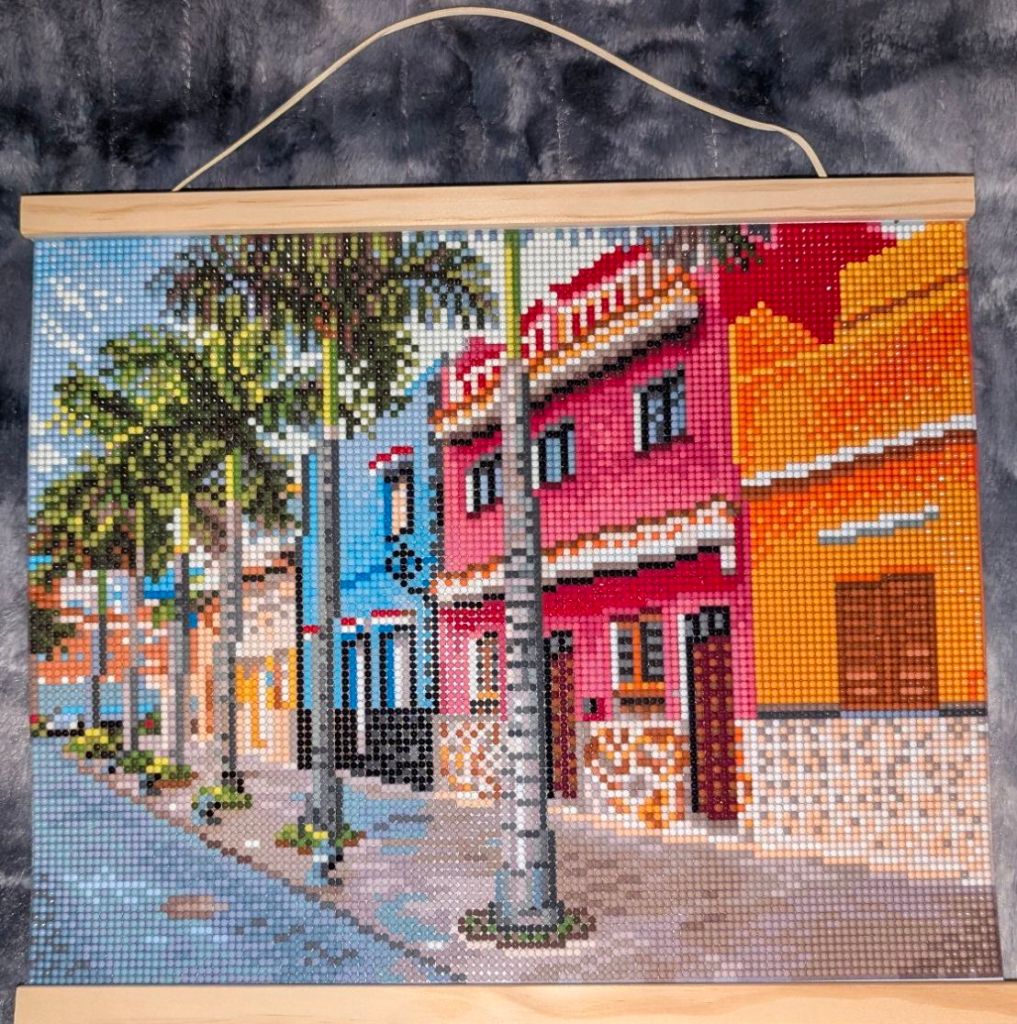
I have so far only completed four of these, believe it or not. I still have so many more to make. I made the surfboards first and then I made those two little ones with the rainbow umbrella and the Adirondack chairs and then the beach scene which is called beach chairs and I just finished working on the fourth one called colorful street. The next one that I’m going to make is the one with the pink flamingo in the swimming pool.
I swear the Michael’s Make Market diamond paintings look like they were taken from real pictures. They look so lifelike. I just don’t know how they can make them look so real. And they are Diamond paintings which means they’re pixelated. It’s just the oddest thing that when you’re standing back or even looking at a picture of it, it looks so real. It almost looks like a photograph. I think that’s what makes me so attracted to this brand as opposed to any other brand that I’ve found because these look like they are actual pictures.
Another thing that I love about these summer Diamond paintings is that they come with their own frames. So I don’t have to worry about buying frames for all of these diamond paintings because they’re already in the box. It makes it so much easier to sell something if it comes with its own frame because then I don’t have to spend extra money and then also charge extra money for the frame. I did however have to buy frames for the Rainbow Diamond paintings from Amazon because they don’t come with frames. The summer Diamond paintings from Michaels are all 11×14 and the rainbow ones are 10×14.
I want to focus on the summer Diamond paintings so that I can list those on Etsy first, because summer won’t last forever, but rainbows do. Although, if you love the beach, you’re going to love it all the time. I will have the summer Diamond paintings in there until they’re all sold out.
Well, another year has passed. I can’t believe time seems to be moving a bit faster every year for me. It seems like 2024 would still have another 6 months left, but no, it’s almost finished. 1 more day.
What have I accomplished in a year? Well, my Etsy shop was very busy this year, busier every month this year since I started. Mainly due to a single item though. A simple friendship bracelet.
I added a listing for lesbian friendship bracelets with the same designs I have for my rainbow friendship bracelets, but I used the lesbian pride flag colors. I also did the bear flag colors and that wasn’t as popular as the lesbian. So this is the bracelet that someone wanted. They sent me a message asking me if I could make this bracelet and they took a screenshot from the Disney+ show Agatha All Along. I said let me see if I can do it and I opened up my friendship bracelet designer program on my computer and figured it out. Of course I did have to Google the design and I found it right away. I just had to change the colors to these specific colors which are the lesbian pride flag colors.
After I sent this bracelet off to this person, I decided to add it to my lesbian pride flag friendship bracelet listing and wouldn’t you know it? Some other people did a search for Agatha all along friendship bracelet and they found it and they bought it and so many people wanted this bracelet. I added three sizes so that it could accommodate small, medium and large.
Two people from Germany bought one (each) and someone in Norway bought one and someone in Ireland wanted to buy it, but they couldn’t afford the shipping from the United States. I got sales on this bracelet in many states and after making it so many times, sometimes everyday, I had to remove the item from my listing because I was in agony. These bracelets take time to make and they take a toll on my hands and my back.
I will eventually make up a whole bunch of bracelets for that listing and I’ll make a whole bunch of the Agatha bracelet as well because I know people will want it again. And I’ve already bought the string for it and have cut it and it’s all ready to go, I just have to start working on them. But I need a break because I’ve been working my fingers to the bone on crafts this whole year, and my hands are about ready to fall off. Not really, but you know, jokingly.
So other things that I’ve been working on are Halloween, Thanksgiving and Christmas box cards as well as a Christmas Advent calendar and also I’ve been knitting Christmas stockings.
The Advent calendar went to my cousin for his son and of course the whole family could enjoy it because I filled it with so much candy LOL. The Advent calendar is from SVGcuts and the fireplace box card that you see on the left side is actually from simply crafty svgs. And then there are two Christmas friendship bracelets in the front that come from an Etsy shop called The One Eyed Artist.
The Norwegian Christmas stockings are from Arne and Carlos. I posted about the stockings a couple of months ago when I made them. I’m making more because I bought so much yarn that I don’t know what else I’m going to do with it other than make a ton more stockings LOL. I’ll probably be working on these until it gets too hot to work with wool yarn.
I’ve also been reading a lot more. I made it a mission to read everyday no matter what. Even if I just read one or two chapters a day, at least I’m reading. I did the Goodreads challenge this year and challenged myself to read 30 books and I exceeded that by reading 48 books. I’m still reading a book and was hoping to finish it to make my Goodreads challenge 49 books, but I don’t think I’m going to make it.
There is one book that I have that I would like to read. That is the entire Wizard of Oz story, but it’s all one book which means there are 15 books that will count as one book unless I decide to add the books individually on Goodreads as I read them. It will most likely take me forever to read it because this one collection in one book is over 2,000 pages and I think I’m going to need to read it in stages lol. So I will add each individual book to Goodreads as I read them.
I have a lot of other books in my Kindle library to read, so I have no shortage of books to keep myself busy with. I also have a lot of books in my Nook that I can read as well.
I’m not doing the New Year’s resolution thing because I think that’s stupid. Especially when a lot of times people never follow through with it. They always say I’m going to start losing weight and I’m going to go to the gym and then they never do and they end up gaining weight. I’d rather just do it if I’m going to do it. I did lose 75 lb in 2023 with ozempic, and then it stopped on Thanksgiving Day and 15lbs have come back on gradually, but I’m still doing ozempic and I’m still trying and I’m doing my best despite the constant junk food being put in my face and constantly being asked if I want to go to fast food places. I have the ability to say no, but I don’t seem to be doing that very well. So that’s something I have to work on.
I am having heart issues because apparently my pulse is too slow. It was 41 the other day at the doctor’s office and they’re sending me to a cardiologist. I’m sure it’s nothing to worry about. I checked my Fitbit watch and my pulse seems to be around 100, but then I checked my pulse on my blood pressure machine and it’s around 40 something to 50 something. So, I guess my fitbit is not really telling me my true pulse rate. I’ll see what happens.
Well, Happy New Year and let’s hope that this year is a good year.
Before I got my Cricut Explore Air 2, I was never really a card person. I don’t know, it just seems like paying several dollars for a greeting card is a lot of money for something that’s 2 dimensional. Something someone is going to put in a drawer or even toss when Valentine’s day is over.
Box cards pop more because they are 3 dimensional. They fold flat and open like a box and stand on their own. Every person I’ve given a box card to has kept it. Some even keep them on display. The doctor’s office displays my cards every year for that particular holiday. The pharmacy has every holiday on display all year.
I made some Valentine’s day cards last year, and I only have a few left. I can make what I don’t have in stock. The reason I’m not making more is because I couldn’t find the right paper this year at Michael’s. But I do have the Easter paper, which means I can make a box with the pink paper. I do have plenty of the pattern paper, it’s just the solid paper that I couldn’t find. It’s just always out of stock.
I’ve been seeing these ads on Facebook for these vintage fonts with other vintage elements like frames with flowers that you would’ve seen from the past. The more I saw the ad, the more I wanted it to make an awesome logo for my Etsy shop.
The company who sells this bundle suggest using Adobe Illustrator, but I prefer to use Gimp. I had to watch some video tutorials on how to make the text in an arch but that was pretty much it. It’s pretty easy when you know what you’re doing.
Now I know my logo doesn’t look very vintage, but I really like it. This will go on all future new products in my Etsy shop.
I added my logo with a transparent background to Cricut Design Space, that way I can add it to my background in whatever shape that is, then flatten the image for print and cut. It’s really easy.
I don’t make Friendship bracelets very often, so when I do it’s usually a custom order where someone requests that I make a bracelet. They usually ask what patterns I have, and I privately share the images, but I think what I will do now is just write a blog post with all the graphics and their names.
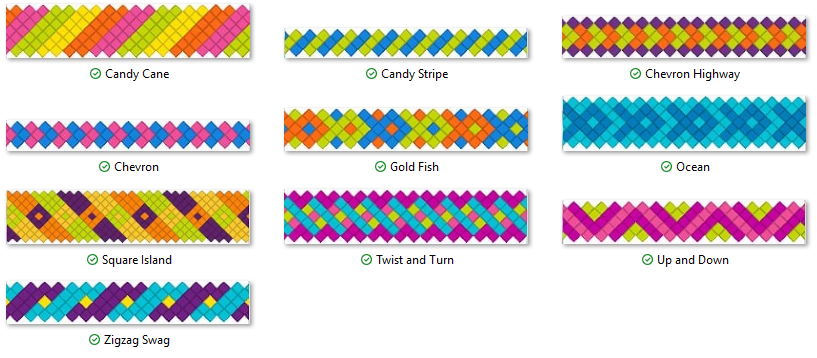
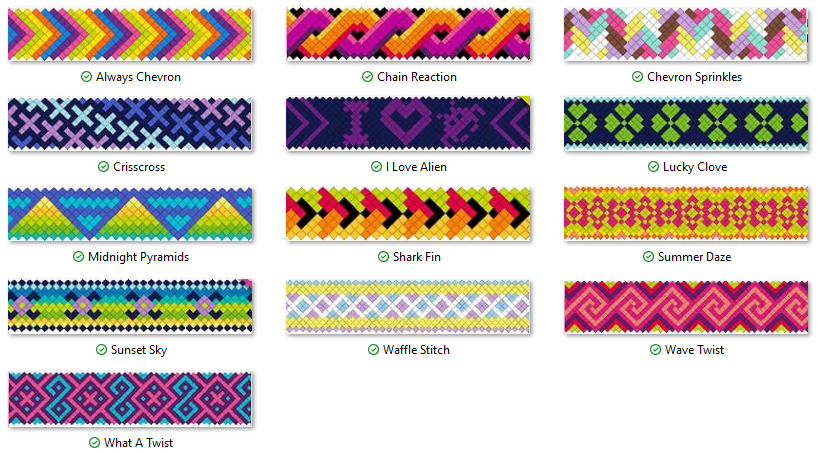
I have an i-Loom that has its own patterns, and I have a list of patterns not in the i-Loom, so I will show the patterns NOT in the i-Loom first. If you are interested in buying a pattern with a special button, please let me know by contacting me through my Etsy shop. My Etsy shop website is GayNerd.Etsy.com.
These are the patterns that are in the i-Loom. These are broken up into their star ratings. The ratings aren’t rated by difficulty because a 4 star pattern might be just as easy as a 1 star pattern, and a 1 star pattern might be more difficult, so I think they are rated based on the amount of strands in a bracelet.
I have been having fun with my i-Loom. I’ve made 4 1/2 bracelets so far (the half is still in the i-Loom as a work in progress). One issue I do have with the i-Loom is that it doesn’t have patterns that were created outside of the app. I have a program called FBD which is short for Friendship Bracelet Designer, and I have used that to create and print patterns in the past, and I could still use that option for making bracelets, but why would I want to do that when I have this new system with the i-Loom?
So how do I get those patterns into the app? Well, this is how I do it. I took a screenshot of the app with a pattern loaded, then in Gimp I removed all the pattern stuff and replaced it all with the pattern I want to add. The only problem is, the only way for me to work on those patterns using this method is to create many images numbered starting with 01, then add them to the Nook, and I have to go into the image gallery, load the first image, work that row, then swipe the screen to show the next image. This way each image shows each row I’m on inside the pink lines. When I get to the end, I have to swipe back to the first image and continue from there. Here’s an example of all 14 images for the pattern I want to work on. It’s supposed to be a Finding Nemo pattern.
This is not an option I will do instead of the patterns they have in the app, this is only an option for when I need to make a pattern that someone wants me to make that isn’t available in the i-Loom app.
I really love the i-Loom app, it would be nice if I could add more patterns because there are tons of patterns that I would like to make that I have in the FBD library. Fortunately for me they have some holiday patterns in the boutique already that I was able to buy, like the hearts patterns for Valentine’s Day, then there’s one with shamrocks for St. Patrick’s Day, and of course there is a pattern called Easter Baskets. Images below.
I’ve already made the first one that is the pink heart with the purple background, I currently have the same pattern in the i-Loom (that’s the one in progress) with red hearts and a pink background, I’ve made the heart braid, except I traded the darker pink with red. I haven’t started the 3rd heart bracelet yet, that one is TBD. Valentine’s Day is still 2 days away, so I’m probably going to skip over that and work on the Shamrock and the Easter Basket one soon.
The first 4 bracelets in the image above from left to right were made with the i-Loom, the other 2 were made with the printouts from FBD. I made the i-Loom bracelets according to the patterns for 7.5 inch bracelets, and naturally neither of them were 7.5 inches. They should’ve had another inch or so, but I made them from the patterns and didn’t go off course, I just stopped when the pattern told me to. Oh well.
And finally… the image next to the bracelets is my embroidery floss collection. I tossed all the i-Loom string because it’s crap, I’m using the DMC and Loops and Threads embroidery floss exclusively because it doesn’t break easily.
I have an Etsy shop, and one of the things a typical Etsy shop needs is a good graphics program for advertising their shop and products. You need business cards, post cards and brochures so people can see what you have in your catalog. My Etsy shop in particular uses business cards as earring cards. I already have those printed and even laminated. What I really need are post cards which are basically bigger business cards, and brochures to include in all orders. The post cards would have a graphic of a coupon on it with a coupon code for the customer to enter for their next order.
I’m actually quite familiar with Print Artist because I had it on my very first computer. Let’s go in the way back time machine to 1997. I don’t remember how I got these cd’s. It might have come with a printer I bought back then, or perhaps it came with my scanner, I don’t know, all I know is I installed it and loved it. It says there are 4 cd’s, 2 of them were for Mac, and my Aunt Louise had a Mac, so I gave her the other 2 cd’s.
When I ordered the newest version of Print Artist 25 Platinum, I bought the CD’s on Amazon. I could have bought the digital download and gotten it right away, but I can wait for the box to come in the mail.
Amazon says it works with Windows XP, 7, Vista and 8, but I have Windows 10. I have seen some reviews from people who say it didn’t work on their computers with Windows 10, but I saw other people with newer computers say it works fine for them. My computer is still brand spanking new, so I am sure I won’t have any issues with installing and using it. At least I hope I don’t have any issues. I guess that’s why I bought it on CD, because if it doesn’t work, I can always send it back to Amazon. If it’s a digital download and it doesn’t work then I’m pretty much boned. The digital download price from their website and the price I paid on Amazon is the exact same price. I didn’t have to pay for shipping since it was over $25.
So yes, I will mainly focus on making the post cards with the coupon code along with a picture of some of the products, as well as a catalog of most of the products I have in my Etsy shop. I think it will be an interesting experience.
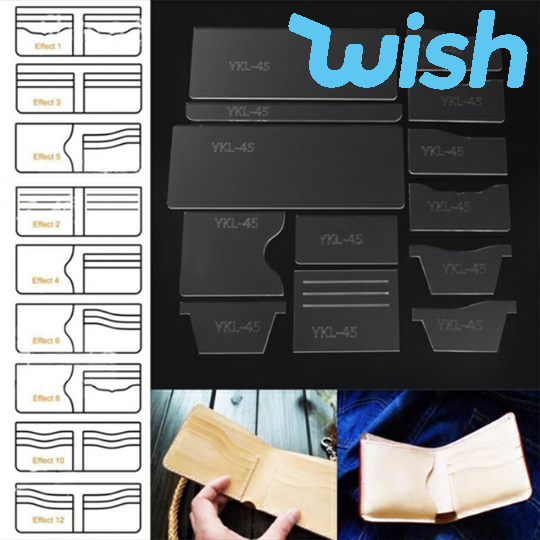
Your wallet is a very personal thing. You want it to have a certain amount of card slots and you want it in a specific fabric or color. Sometimes they don’t have the wallet you are looking for, and sometimes they have the right layout, but not the right color, or sometimes the right color, but not the right layout. It’s especially frustrating for me when I find the perfect wallet, but it’s like $60. I don’t have that kind of money for a wallet.
I found this on the Wish app for $11 plus $5 for shipping. All I need is the leather or fabric and to know how to put it together. Well, I have a sewing machine and I’ve seen enough videos to know how to put it together, I just need the material.
My partners wallet has a zipper, so I’m going to make both of us new wallets with a zipper and I will do his layout the way he wants with the material he wants, and I will make mine with the material I want with the layout I want. I actually like the layout in the left column on the very bottom in the image above. I also want to put a flap above the left side that comes down with a window for my ID. My partners wallet actually has that. Then when you lift the flap, there’s all your pictures. That is the perfect layout for me.
My current wallet is falling apart. I thought it was real leather, but apparently it’s not. Honestly, I would rather it weren’t leather, but if fake leather means it’s going to fall apart, then perhaps I might be better off with thick fabric. I’ve always hated the layout, but it was the only one I could find that wasn’t expensive, and I wanted a chain wallet because I was constantly losing my wallet, and what’s funny is I took the chain off years ago.
Well, the wallet template will take about 3-4 weeks to arrive, and when it does I will make a couple of wallets and if I am good at making them, perhaps I will sell them. Price will depend on the material I use.
Yesterday I tried laminating my earring cards and punching the earring holes with the sideways U’s, but it wouldn’t work because the plastic is too thick to be able to punch through. Last night I thought, I wonder if I was able to laminate 2 cards back to back so both cards are laminated on the front only. If I could laminate one side, perhaps it would be thin enough. I was right, because it worked.
Today I took half of my earring cards and placed them all back to back inside the business card laminating pouches and ran them through the laminator. I actually ran them through several times. When they all came out the other side, I cut them around the edges of the cards and then I used the earring display card punch to make the holes, and it worked without any problems. I watched my show and then decided to run more through doing the same thing, but this time it didn’t work the same way. I kept having the same issues I was having when I was trying to punch the card with a full lamination. It just didn’t want to cooperate with me anymore.
The business card laminating pouches are 5Mil and the full size sheets are 3Mil, so I think I will just toss the ones that I have and just work with the ones that I have already punched and not worry about trying to make any more since I haven’t actually sold any earrings in a long time. So it’s really just a waste of my time, but I wanted to see if I could get it done, and I have, so I’m happy. Who knows if someone will buy earrings in the future. It might happen, or it might not, I don’t know. All this work could be for nothing, or perhaps it might bring me a lot of referrals if one person buys earrings.
So I’m happy I was able to figure it out, and hopefully I can get it to work again in the future.